Learning Zephyr RTOS on Real Hardware: How Our 24 Week Course Works
How our 24 week Zephyr RTOS course works: 23 units, labs proven on a real ESP32-S3 board over UART, quizzes, and three certificates.
In the last post we looked at what Zephyr is and wrote a small program with two threads and a message queue. This time we want to show you how we teach it. Our course, Zephyr RTOS on ESP32-S3, runs for 24 weeks, and every lab runs on a real board on your desk.
Here is how it is laid out, how your work gets checked, and how you earn the certificates.
Who the course is for
The course is for people who have written some C and now want to build firmware the way real products are built, not just Arduino sketches. It is set at undergraduate level.
The one thing you must have is strong C. Zephyr code is full of pointers, structs and macros, and we do not stop to teach those. If you need to build that base first, our C programming course (C-PROG-A) covers it. Some earlier embedded work helps too, such as our EMB-F401-A or ESP-IDF-A courses, but it is not a must.
You will work on an ESP32-S3-DevKitC-1 board with Zephyr 4.1 and the west tool. Later units add parts like an I2C motion sensor, a BMP180 pressure sensor, and A4988 and TMC2209 stepper drivers.
How the 24 weeks are laid out
The course has 23 units with 211 topics. They fall into three stages, and each stage ends with a certificate.
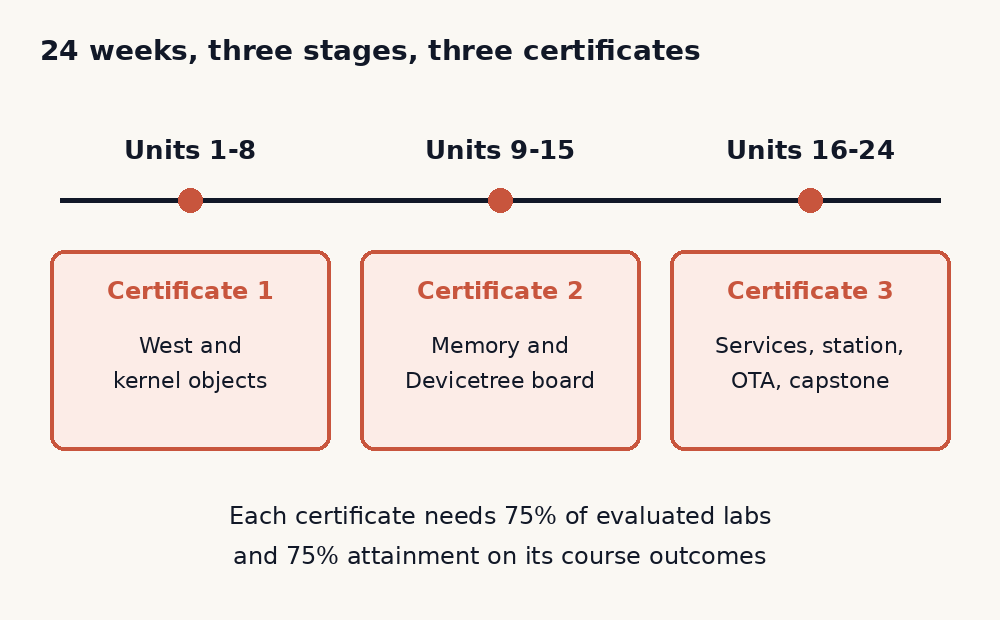
The first stage runs from Unit 1 to Unit 8. You set up Zephyr and west, flash a first program, and print Hello World over UART0. Then you work through the kernel objects one by one: threads, sleep, semaphores, mutexes and condition variables, message queues, software timers and work queues. Unit 8 closes with the first certificate, West and kernel objects.
The second stage runs from Unit 9 to Unit 15. It starts with memory, using heaps and Zephyr's hash map. Then comes Devicetree and Kconfig, where you learn how overlays and aliases tell your code which pins and buses to use. After that you drive real hardware on the kit: GPIO, PWM, I2C sensors, and NVS flash storage for things like a boot counter. Unit 15 closes with the second certificate, Memory and Devicetree board.
The third stage runs from Unit 16 to the end. You add services that real firmware needs: logging modules, a command shell on UART0, and zbus channels for passing data between parts of your program. Then you move a stepper motor with an A4988 driver and look at the TMC2209 over UART. After that you join a Wi-Fi network as a station, serve a small web page from a soft access point, and download an update over the air (OTA). The course ends with the capstone in Unit 24 and the third certificate, Services, station, OTA, capstone.
To be clear about scope, MQTT and BLE are not part of this course.
How labs and proofs work
Each lab asks your firmware to print a short, fixed line over UART0 when the task is done. We call these tokens. For example, a semaphore lab looks for SEM:OK, a Devicetree lab looks for DTS:OK, a stepper lab looks for STEP:OK, and an OTA lab looks for OTA:OK. The board is connected to your computer over USB, and the platform reads that serial output to decide if the lab passed. In Unit 1 we walk you through the board, the USB-UART link and the Device Bridge, and your first task is just to flash a ready program and prove the setup works.
So the proof comes from your real board, not from a simulator. If the wiring is wrong or the code hangs, the token never shows up.
There are two kinds of labs. Practice labs are run-only. They help you get started and do not count toward grades. There are 10 of these, mostly in the first few units. Evaluated labs are submitted and graded, and they count toward your progress and certificates. There are 96 of these across the course.
How you are assessed
Every topic ends with a short checkpoint quiz. Across the course that adds up to 1,288 multiple choice questions.
Grading is outcome based. The course has six course outcomes, CO1 to CO6, and each one covers a group of units. CO1 is the kernel objects in Units 1 to 8. CO2 is memory, Devicetree and Kconfig. CO3 is GPIO, PWM, I2C and NVS. CO4 is logging, shell and zbus. CO5 is stepper motion. CO6 is Wi-Fi, OTA and the capstone. Your quiz and lab results are mapped to these outcomes.
To earn a certificate you need two things for the outcomes it covers. You must complete at least 75 percent of the evaluated labs, and you must reach at least 75 percent attainment on those outcomes. The first certificate looks at CO1. The second looks at CO1 to CO3. The third looks at all six.
The course follows NBA-aligned outcome based education and carries 6 credits.
What the capstone is
The capstone in Unit 24 does not bring in a new topic. Instead, you pick three systems you already built in earlier units and make them run together in one firmware.
The proof follows the same idea as the labs. Your board prints the READY line and then the three earlier proof lines, all from one program. Getting there is mostly about order. You have to bring things up in the right sequence, keep the console on UART0 free, and make sure one part does not break another. There are also rules about which radios you may use.
This is close to real product work, where getting features to live together is often harder than building each one.
Is this for you?
It is a good fit if you are comfortable in C, you want to move past setup() and loop(), and you are happy to wire up a board and debug it when it does not work. It asks for steady work over 24 weeks.
It is not the right start if you are still new to C. Take the C course first and come back. It is also not the course for you if you mainly want MQTT or Bluetooth, since we leave those out on purpose.
Where to go from here
You can see the full unit list, the outcomes and the certificate rules on the course page: Zephyr RTOS on ESP32-S3.
If you tried the two thread example from the last post and enjoyed it, this is the next step. Have a look at the syllabus and see if it fits what you want to build.